eighteen weeks pregnant

  • Subscribe to our RSS feed.
  • Twitter
  • StumbleUpon
  • Reddit
  • Facebook
  • Digg
Affichage des articles dont le libellé est orange season. Afficher tous les articles

mardi 16 avril 2013

Honey Chai Orange Marmalade

Posted on 22:46 by Unknown


Orange season is done here, but I was able to get some good pickings off the trees and try the next thing on my list... marmalade.

I never liked orange marmalade… until I made it myself.

I have grown to love the tingling flavor and beautiful golden color. It is especially delicious with almond butter and raw honey on sourdough bread.

I am now hooked.


Last year and this year I've been on a mission to use these beautiful balls of sunshine as much as I could.

I've made Crispy Orange Chips, Tangy Orange Powder, Candied Orange Spice Peels, Homemade Orange Extract, Honey-sweetened Orange Curd & Orange Curd Bars, Honey-sweetened Almond Orange Shortbread Cookies and some fantastic Honey Orange Marmalade Rolls using my homemade marmalade.

I still have a looong list of recipes and ideas to try, but they will have to wait until next season.


Oh, before I go on about the marmalade. I want to do cover two things... 1) announce the 3 winners of the Safe Harvest Seed Bank Giveaway and 2) talk a little more about the 7-Day Real Food Challenge.

First, thank you everybody for participating in the giveaway and please give a round of applause to... Julie Cox (Liked Just Making Noise on Facebook), Krissa Jeldy (Liked Just Making Noise on Facebook) & Esther DeWaters (Liked Just Making Noise on Facebook).

Congratulations ladies!! I know you will enjoy the seeds. I have not planted mine yet, but making plans to do that in the next couple months. Woohoo!

Next, the 7-Day Real Food Challenge... I am really looking forward to it.

Why? Because it's something new and a change of pace for my family.

I've been cooking and preparing real food for several years now, but every once in a while I get into a runt. If you are finding yourself in a runt too... come join us!

Or... maybe you are wondering how you can prepare more wholesome meals for you and your family. Wondering what you should or shouldn't eat. Wondering if there's something out there that is simple enough to get you started... 

That's where the 7-Day Real Food Challenge comes in to help! With 29 bloggers (including me!) on the support team, along with a full grocery list already prepared and recipes for all the meals for the week all done and ready for you.

Gosh, how many of you have had your grocery list done by someone else for once? Me, never! Nice having the week off from making my grocery list!

Anyway, I really hope you all will seriously think about it and join us! It will be great, PLUS there are several awesome giveaways for for those who join.

Okay, now... let's talk about marmalade.


When I was googling around to find a good recipe for orange marmalade... I was inspired to try chai spices to give the marmalade some depth and character.

The end result was amazingly delicious...

I used Black Chai Tea from Bulk Herb Store, but you can use whatever you have on hand.


Honey Chai Orange Marmalade

6 large sour oranges
3 cups water
4 Tbsp Black Chai Tea
1-2 cups honey (use less if you want it tart or more if you want it sweeter)

1. Wash the oranges. It is best to use organic, if possible.

2. Cut 5 oranges in half. Cut out the center white meat (the part that runs down the middle of the orange) and remove seeds.  Do this over a bowl to catch the juice that will drip out. Discard the center white meat and seeds.

3. Set your cutting board on a large plate or flat bowl to catch the juice while slicing the oranges.

4. Slice the oranges into very thin or chunky slices.

5. Put the sliced oranges and all the juice into a large stainless steel pot. Add water and bring the mixture to a boil, stirring often.

6. Put 4 Tbsp of Black Chai Tea into a tea ball or bag and add into the mixture. Allow the mixture to a gentle boil and cook down for several minutes. Stir it a few times to prevent burning.

7. Add the honey and stir well. Bring the mixture down to a high simmer or keep at a low boil. Allow it to simmer (or boil) for about 30 minutes to 1 hour, stirring it often to prevent burning.

8. After the mixture has been cooking for 15 minutes, stay close and start stirring the mixture more frequently. It will start to thicken pretty quickly, so keep a close eye on it.

9. There is two ways to test if the mixture is done...

Scoop a small amount of marmalade onto a cold plate, let it cool completely. Rub the  marmalade to test for thickness.

- If watery, continue cooking it.
- If too thick or hard, add more water or tea and cook gently.
- If firm (neither watery or hard), it is done. Turn off heat.

OR

Use a rubber spatula and draw it through the mixture. If the mixture fills in the space created by the spatula very quickly, it’s not done. When the mixture is almost ready it will fill the space more slowly, leaving an space for a few seconds before filling in.

Keep in mind that the mixture will thicken even more after it cools. So, don’t over do it!

10. Once the marmalade is done, move the pot away from the heat. Juice the last remaining orange and add it to the marmalade. Stir, pull the chai tea out and let it cool. If you think that you overcooked the marmalade and its too thick, simply add more water, chai tea or orange juice into the mixture.

11. When cooled, spoon the marmalade into jars and put them in the fridge overnight to cool and set completely.

The marmalade can be store in the fridge up to several weeks or store in the freezer for up to a year. I’ve had a jar of marmalade sit in my fridge for almost 3 months and it still tasted great!


What do you think? Would you make this? I am thinking I want to try making lime marmalade... never seen or heard of that, but why not?!


Read More
Posted in marmalade, orange season, oranges | No comments

vendredi 1 mars 2013

Honey-sweetened Orange Curd Bars (gluten-free & dairy-free)

Posted on 21:23 by Unknown


We are finishing up a great week with a mission team from one of our supporting churches. I am always exhausted when the teams leave, but feel spiritual full from being able to fellowship with other believers & friends!

The last few weeks have been emotionally draining for me. A lot has been happening and God is opening new doors and closing old doors, but...

it's all good.

Basically, we are heading for a new adventure soon. I'm sure you will know soon enough (or you can go to our ministry blog and subscribe to stay updated) Please keep us in your prayers, thanks!

Now, these bars...


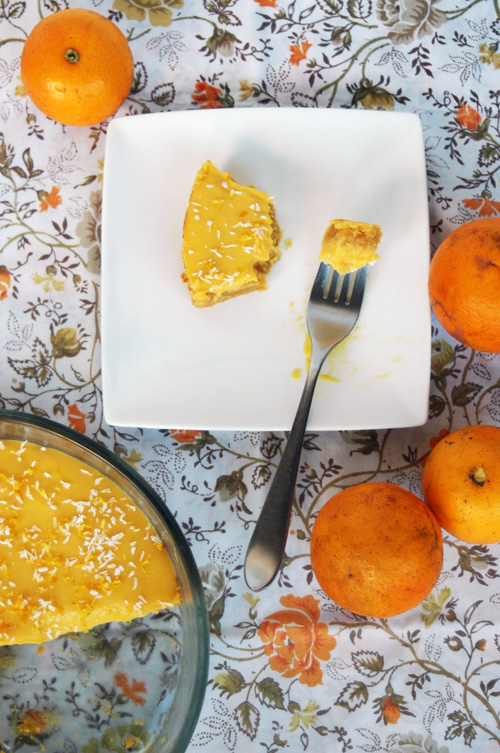
I really don't need to say much about these bars. I think the pictures speak for themselves. A thousand words, right?

These guys are so good and totally guilt-free. We even enjoyed it for breakfast one morning!


I didn’t think of this until after I took the pictures, but I think some homemade chocolate syrup would be the “cherry on top” for these delicious curd bars!!

Honey-sweetened Orange Curd Bars
(Gluten-free & Dairy-free)

1 3/4 cup almond flour
1/4 cup coconut flour
3/4 tsp sea salt
1/2 cup butter (or coconut oil for a diary-free option)
1/4 - 1/3 cup honey
1 - 2 Tbsp orange zest
2 tsp vanilla
1 egg
1 recipe of orange curd

Make the orange curd (if you haven’t) and let it cool in the fridge.

Preheat oven to 375 F. Grease an 8 x 8 square or circle pan. Set aside.

Mix together dry ingredients in a large bowl.

Mix together wet ingredients and pour over the dry ingredients. Mix until well combined.

Evenly spread the batter into the greased pan. Place in the middle of the oven and let it bake 15-20 minutes or until the top and edges are lightly brown. It may puff up a little, but no worries.

When done, test the middle with a toothpick or knife. It should come out clean. Set it aside and allow it to cool completely.

When cooled, spread the orange curd evenly on top and let it firm up in the fridge, if needed. We think it tastes better cold than room-temperature!

Before serving, sprinkle some orange zest and coconut flakes on top.

Also, don't forget the chocolate syrup... I know it will be amazing!


Read More
Posted in curd, curd bars, dairy-free, gluten-free, honey, orange season, oranges, wholesome sweets/desserts | No comments

lundi 18 février 2013

Honey-sweetened Orange Curd (with dairy-free option)

Posted on 21:11 by Unknown


I love curd, even though the name doesn't sound appealing... the delicious creamy texture will have you eating it by the spoonfuls straight out of the jar!

Making curd is a great way to use up lots of eggs and enjoy a protein-rich dessert. It is so simple to make and only requires a handful of ingredients... eggs, honey, zest, butter (or coconut oil) and orange juice.

You can even try different fruit juices... I hope to try mango and passionfruit soon. I'm sure they will be so good!


I love that I don't have to spend a lot of money & time to create this nourishing treat and you can use it to dress up just about anything... layer cakes, cookies, tarts and more.

My two favorite ways to enjoy this yummy curd is over ice cream (of course!) and spread over a crust to make bars.

Simple, yet fancy!


Honey-sweetened Orange Curd (with dairy-free option)

3 large eggs or 6 egg yolks
1/4 - 1/3 cup honey
fresh zest of one orange
6 Tbsp butter (or coconut oil for a dairy-free option)
½ cup orange juice

In a medium saucepan, whisk together eggs, honey & zest until smooth.

Add in butter (or coconut oil) and orange juice. Cook over medium heat and whisk until smooth.

Continue to cook & whisk until the mixture thickens and you start to see bubbles popping on the surface.

Remove from heat and pour into a fine sieve set over a bowl. Gently stir the curd through the sieve.

Cover the bowl and store in the fridge for several hours to thicken.  Should keep for about one week in the fridge.

Make the Orange Curd Bars or top it over some homemade ice cream!


Have you made curd before? What flavors?

Linked up at Simple Lives Thursday


Read More
Posted in curd, honey, orange season, oranges, wholesome sweets/desserts | No comments

jeudi 14 février 2013

Honey Orange Marmalade Sourdough Rolls

Posted on 12:56 by Unknown

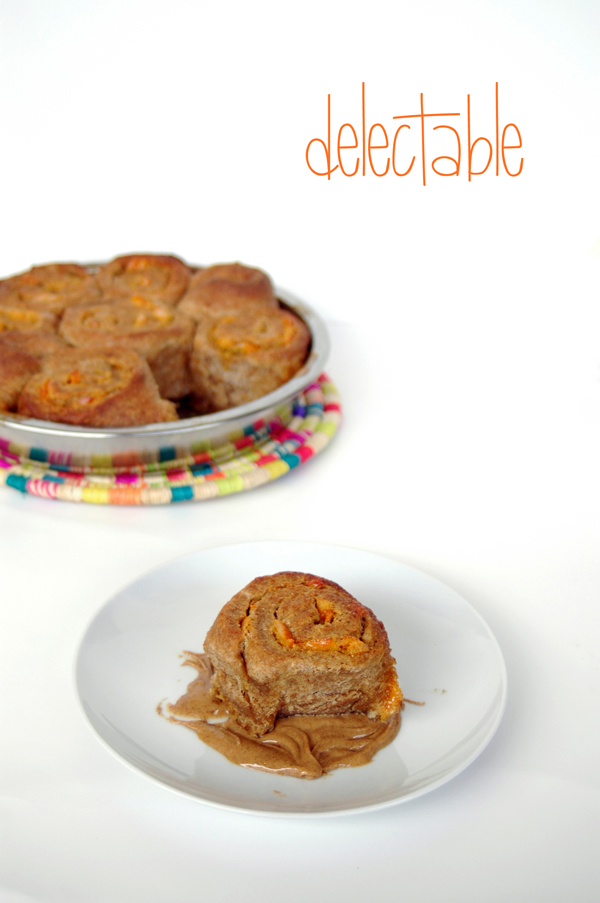
With wonderful bursts of citrusy tartness and creamy sweetness... I have to say these were the BEST rolls I have ever made and I’m totally serious.

I'm not the kind of person who goes around saying "these are the best ever" to anything that tastes good.

No, I save that for the best and these rolls are the best... actually, they are way beyond the best.

They are... delectable.


Slathered with my homemade Chai-Spiced Honey Orange Marmalade (will share the recipe with you soon!), these rolls pair up fantastically with honey & almond butter.

There is just something amazing about the combination of tangy orange marmalade, raw honey & creamy almond butter with anything sourdough.

I discovered this finger-licking combo several months back and simply adore slathering them on sourdough pancakes, english muffins, waffles, butter biscuits and now… rolls!

Oh sweet, delicious rolls!


Yep, I'm convince it is way better than the strawberry cinnamon rolls I made after I first started using sourdough.

Tart, sweet, citrusy...

Sweet goodness! I am going to end up repeating myself trying to explain why it's so dang good… guess you will have to go make these rolls yourself to find out just how good they are.


Honey Orange Marmalade Sourdough Rolls

Dough
1/2 cup sourdough starter
1 cup milk, cultured dairy, coconut milk or water
1/4 cup rapadura or coconut sugar
1/4 cup melted butter or coconut oil (not hot)
1 teaspoon vanilla or orange extract
2 - 3 cups whole wheat flour
1 tsp sea salt
1 tsp baking soda
1 tsp baking powder


Honey Glaze
1/3 cup butter or coconut oil
1/3 cup honey

In a medium bowl or KitchenAid mixture (using dough hook), mix together sourdough starter and milk. Add in rapadura, butter and extract. Stir well. Start with adding 2 cups of whole wheat flour and stir/knead to combine. Take the dough out of the bowl if you are kneading it by hand.

While watching and feeling your dough, add in more flour until you have a dough that is smooth and firm, but not dry. Put the dough back in the bowl, cover and set it aside to sour for 8 hours or more (less if you have a very warm kitchen).

Preheat your oven to 375 F and put the oven rack in the middle slot of your oven.

Add butter to a 9 inch square or circle baking pan. Put it in the oven while it is preheating to melt the butter/oil. Once melted, take out and add in the honey. Set aside.

While your oven is preheating, pull your soured dough out of the bowl and flatten it with your hands. Sprinkle on 1 tsp each of sea salt, baking soda and baking powder. Turn the dough into itself a few times and knead it for about 3 to 5 minutes. Focus on incorporating the 3 dry ingredients.

Once it feels all combined, roll your dough into a rectangle about 1/4 inch thick. You can make it thicker, but then it will be really 'bready'. Take care not to let it roll out too thin that it breaks apart as you roll it up.


Orange Marmalade Filling

Butter or coconut oil, softened
Orange Marmalade
Honey

This is where I simply eye-balled it. You really can't have too much filling in your rolls. At least that's my opinion  :o)

If you really need measurements, start with 1/2 stick of butter, a cup of marmalade and 1/4 cup honey. If you think you want more... go ahead! Just remember you've got sweetener in the dough, spread on the dough and underneath the dough as it bakes.

Spread the butter/oil onto the dough. Drop spoonfuls of marmalade and spread it out evenly. Drizzle the honey all over.

Now, carefully roll up the dough up tightly. Take a serrated knife and cut (using a careful sawing motion) the roll in half. Then into fourths and then cut each fourth into thirds. You should have about 12 evenly sized rolls. More or less.


Once cut, carefully move your rolls into the prepared baking pan. Have your rolls touching, but not crammed together. The slight touch causes them to rise up nicely. If you have extra rolls that won't fit in, simply put them in a prepared muffin pan or smaller baking pan.

Put the rolls in the oven and bake for 30 to 40 minutes. Check on them at 25 minutes to make sure they aren't already done.

When done, flip them onto a plate and serve immediately. They are delicious with creamy almond butter and more honey drizzled on top. Enjoy!!

Am I crazy or do you like this combination too?


Linked up at Simple Lives Thursday
Read More
Posted in breakfast, honey-sweetened, orange season, sourdough, sourdough cinnamon rolls, sugar-free, whole grains | No comments

mardi 18 décembre 2012

Honey Sweetened, Almond Orange Shortbread Cookies

Posted on 20:10 by Unknown


I am over at A Little Bit of Spain today with an easy & delicious recipe for buttery shortbread cookies. 

These amazing cookies are sweetened with honey, flavored with orange extract & zest and jazzed up with chocolate topped with more orange zest!

Head on over and get the recipe. Your family will love them and you will want to make several batches of these yummy cookies to give away as gifts!

Have a great Christmas!


Read More
Posted in butter, chocolate, healthy fats, honey, naturally sweetened sweets, orange season, oranges, wholesome cookies, wholesome sweets/desserts | No comments

samedi 15 décembre 2012

Make it Yourself: Homemade Orange Extract

Posted on 21:30 by Unknown


It is now orange season around here and my trees are simply overflowing with delicious balls of sunshine!

Last season I dehydrated orange slices and made some orange powder, both are fantastic for baking and flavoring your tea! I also made some orange extract, which I just opened and strained a few days ago.


After I got over the "hurdle" of making my own Homemade Perpetual Vanilla Extract last year... I became obsessed with making my own extracts.

I did some research and decided to try making extracts from orange, lemon, cacao and almonds.

All you need is vodka and a jar. So easy!

I planned to leave them for only 3 months, but then decided to leave it for another 3 months. Then basically forgot about them. I don't recommend doing that.

Now it has been almost a year (the date on the jar is Jan. 25th, 2012!) and thankfully extracts are pretty forgivable. I spied them after coming home from our USA furlough & decided to open up the orange extract to see if I can use it. I had the vision of using it in my shortbread cookies.

When I first opened the jar... a warm, sharp smell of orange tingled my nose. I had a little taste and the flavor was nice & smooth with a hint of bitterness.

Success!

I made some delicious almond orange shortbread cookies (recipe coming!) using the orange extract and it was simply delicious! The orange flavor stood out nicely without it being overpowering... just the way I like it.


Homemade Orange Extract

  • 2 large oranges (preferably organic)
  • Vodka (higher proof is better)
  • 1/4 cup filtered water (will extract more flavor)
  • Pint-size glass jar
You can do it one of the two ways with the oranges... Peel them or zest them. I peeled them because it was easier, but some like to zest the oranges to avoid the white part because of its bitterness. Either way, you will get a wonderful orange flavor.

Put the orange peels or zest in a clean jar, add water, cover with vodka and seal it tight. Store in a dark, cool place and shake it whenever you think of it.

The extract will be ready in about 6 weeks. You can leave it longer for a slightly stronger flavor, but no longer than a year!  ;o)

I am going to open up my other extracts and see how they turned out. Hopefully I will be sharing recipes with you in the near future!

Have you made your own extracts yet? What flavors have you made? If you haven't, try making vanilla extract or orange extract and experience how easy it is! 


Read More
Posted in homemade extracts, orange season, oranges | No comments

mardi 7 février 2012

Make It Yourself ~Tangy Orange Powder

Posted on 14:02 by Unknown
Pin It


I am having too much fun taking pictures of these gorgeous orange chips and powder! The rich, sunny colors and beautiful, deep details just makes me want to keep clicking away!


Anyway...


I've already used this beautiful powder for a few things and have many more delicious plans for it! It smells like sunshine every time I open up the jar... hmm, must remember that when we have dark, rainy & cloudy days!


After dehydrating all those sunshine {orange} slices and enjoying them like chips and steeped in tea... I began to wonder if there were other ways to enjoy these yummy orange chips.


I googled around and came across this site that suggested to chop or grind the orange chips into powder, which can be used to flavor soup, fish, sauces or use has a garnish.


hmmm... interesting.


So, I threw in enough orange chips to fill my Blendtec and gave it a whirl... well, several whirls until it was powdery and smooth. It looks a little crumbly because of the natural oils from the rinds... simply wonderful!


I pour the powder into an airtight quart mason jar and kept throwing in more orange chips until I had almost 2 quarts full of tangy orange powder. And I still have about 1 1/2 gallons of orange chips to enjoy!


Ahh, lovely!


I have already used it to spice up cinnamon rolls, make drinks, give a tangy crunch to our favorite snack and more. I will {hopefully} be sharing these recipes soon!!


When you make these, make sure you store them out of direct light to protect the natural oils. They should last a long time  ;o)


Read More
Posted in dehydrated orange slices, dried orange chips, make it yourself, MIY, orange powder, orange season, oranges | No comments

mercredi 1 février 2012

Crispy Orange Chips (a.k.a - Dehydrated Orange Slices)

Posted on 22:20 by Unknown
Pin It


These orange chips look like the sun... with beautiful details of fire going out from the center.

Whenever you open up the jar, a sweet & bright smell frolics through your senses... giving you a burst of energy and happiness.


We are nearing the end of our orange season here. This year I've started to appreciate my citrus trees more, especially the oranges... last year I hardly did anything with them because I didn't know what to do with it all! It was easy to grow tired of eating them and the juice was simply too sour to enjoy a glassful.

With some planning... I made candied orange spice peels and save the juice to make creamy popsicles & smoothies. I've used more orange zest in my baked goods then I ever have in my life!

With more oranges coming off the trees, I googled around and found this great site sharing all the different ways you can use the peels. One suggestion was to simply dehydrate the peels for later use, but I decided to use the whole orange instead...


Because I remember seeing a post somewhere with some chai tea and a whole dried orange slice added in for some fun flavor... I saved and filed that in the back of my mind.

So glad I did!

Now I have almost 3 gallons of dried orange chips. I've already enjoyed several slices in my Rooibos tea and the girls love nibbling on them... they are actually a yummy snack! 

Thinking these sunshines would be great to break up and mix into some trail mix or oatmeal. Hmm!


You can use any kind of citrus fruit you have... I had some lemons (didn't get very much this year, sad!) and made a quart of dried lemon chips. Haven't tried using them yet. I am dehydrated some grapefruit right now and have plans to use them for a homemade cleaner.


It is super easy...

Simply wash 'em, slice 'em (about a quarter-inch thick), seed 'em and laid 'em on sheets.

Slide them in or sack them on your dehydrator of choice and turn on to 115 - 135 degrees (I prefer the lower temps to preserve the natural oils). Dry them for 5 - 12 hours... they need to be brittle. Store them in airtight jars and out of light.

What to Do With Them?

  • Add some slices in a container of water or tea and leave in the fridge. The oranges will leave a nice flavor in the water. So refreshing!
  • Add a slice to your favorite tea. The longer you leave it, the stronger the flavor and it will not turn bitter.
  • Chop it up and create your own tea mixes. I already have some ideas!
  • Chop it up and use it to flavor dishes or simply garnish your salad. I'm thinking...
  • Throw some in your blender or coffee grinder and make some powder. 
  • Use for decorating and get some color into your home! Check out what I posted on my board at Pinterest.

Want some?

linked up at Friday Food Flicks, Simple Lives Thursday, Make-Ahead Mondays, Superfood Sunday.

This post may contain affiliate links. If you purchase a product through an affiliate link, your cost will be the same but I will receive a small commission. The commissions I receive goes to support my family, our ministry and helps keep my blog going. Thank you for your willingness to use the links to support us & help me keep Just Making Noise going!


Read More
Posted in citrus fruit, dehydrated orange slices, dehydrator, dried orange chips, orange season, oranges, perserving naturally, raw food, wholesome snacks | No comments
Articles plus anciens Accueil
Inscription à : Articles (Atom)

Popular Posts

  • Pregnancy Notes: Postpartum Herbal Sitz Bath {recipe}
    Herbal sitz baths are extremely soothing, relaxing, healing  and a  great way to pamper a new mama after going through the tiring workout o...
  • Contact
    Please contact me if you... Have any questions. Want to be a part of Sweet Wholesome Wednesday . Would like me to review a book or products ...
  • About A Deaf Mama
    Ears to hear and eyes to see—both are gifts from the Lord. Proverbs 20:12 Hello! My name is Marillyn Beard and I am married to a wonderful G...
  • Can You Have Dessert for Breakfast?!
    Okay, this is not a dessert, but it sure LOOKS like it! I'm not the kind of mama that feeds her family sugar for breakfast. Who says yo...
  • Pumpkified Mousse {a Sugar-free, Candida-Diet Dessert for Fall}
    ( photo credit ) Note from Marillyn:  During the months of September and October you will be seeing several good blogger friends to do guest...
  • Sweet Wholesome Wednesday: Spicy Ginger Snaps
    Can't believe it's Wednesday already! Whew! Did you all get a chance to look at Divina's Coconut Macaroon Tart last week?? Wow...
  • Possibly World's First: Homemade Crunchy {grain-free} Roasted Chickpea Cereal!
    Remember my post a while back about our new favorite snack ? Those crunchy, delicious little balls that are so healthy & addictive?! Wel...
  • Let's Celebrate National Ice Cream Month {Giveaway & Discount!!}
    I almost forgot about National Ice Cream Month!! Yes, me... the ice cream queen, almost forgets a very important event... tsk tsk. Well, I h...
  • Catching Up & News!
    I'm finally getting back into the world of blogging, but... I have to be honest... I did not miss blogging. Not one bit. Believe me, bl...
  • You've Got Ice Cream Questions? I've Got Answers!
    Ever since I first published the ice cream ebook ... I have been asked question after question from those who were wanting to buy the book,...

Categories

  • 7 Day Real Food Challenge
  • adobe house
  • advent
  • agua de sandia
  • almonds
  • aloe vera
  • Alternative Laundry Series
  • apples
  • avocados
  • babies
  • babywearing
  • baked oatmeal
  • bakes oatmeal
  • beans
  • beef tongue
  • beef tongue recipes
  • Berkey products
  • birth DVDs
  • birth story
  • birthdays
  • blackberries
  • Blendtec
  • blog awards
  • body scrubs
  • bones
  • book reviews
  • books
  • Bookworm Reports
  • breakfast
  • breastfeeding
  • Bulk Herb Store
  • Bundle of the Week
  • busy life
  • butter
  • butter oil
  • butternut squash
  • Caribbean Adventures
  • chickens
  • chickpeas
  • childbirth books
  • chocolate
  • chocolate cake
  • chocolate peppermint cake
  • Christian books
  • Christmas
  • Christmas gifts
  • cinnamon
  • citrus fruit
  • cloth
  • cloth diapers
  • cloth pads
  • cloth wipes
  • coconut flour
  • coconut oil
  • coconut palm sugar
  • coconuts
  • comfort food
  • cookbooks
  • cookies
  • cranberries
  • crock pot
  • cultured dairy
  • curd
  • curd bars
  • dairy-free
  • deaf
  • December Photo Project
  • December Photo Project 2011
  • dehydrated orange slices
  • dehydrating sourdough
  • dehydrator
  • desserts
  • diary-free
  • dried orange chips
  • easy frosting
  • ebook
  • eBook Bundle
  • ebook discount
  • egg yolks
  • elderberries
  • essential oils
  • fall recipes
  • family
  • FAQs
  • farmer's markets
  • fermented cod liver oil
  • Fight Back Fridays
  • filtered water
  • fluoride
  • food news
  • Foodbuzz
  • foodie fights
  • Foodista
  • free stuff
  • frugal meals
  • frugal snacks
  • garbanzo beans
  • gardening
  • garlic
  • giveaways
  • gluten-free
  • GMOs
  • GNOWFGLINS Dehydrating Class
  • GNOWFGLINS e-Course
  • grain-free
  • group b strep
  • guest post
  • handmade
  • Harvest Your Health Bundle Sale
  • He is risen
  • healthy fats
  • healthy nuts
  • healthy postpartum
  • Hello Morning Challenge
  • herbal medicine
  • herbal remedies
  • herbal sitz bath
  • herbs
  • homebirth
  • homemade
  • homemade candy
  • homemade cereal
  • homemade chorizo
  • homemade extracts
  • homemade mayonnaise
  • homemade snacks
  • homemade snacks. traveling
  • homemade sourdough tortillas
  • homemade tea
  • homemade trail mix
  • homemade vanilla
  • homemade wipes
  • Homemaking eBook Bundle Sale
  • homeopathy
  • homestead
  • homesteading
  • Honduras
  • honey
  • honey-sweetened
  • horchata
  • ice cream
  • ice cream pie
  • Italian Drip Sandwich
  • Jesus
  • JMN videos
  • Just Making Ice Cream
  • kefir
  • kelp
  • kitchen gadgets
  • labor and birth
  • lacto-fermented food
  • Life
  • life in Costa Rica
  • life in Honduras
  • limes
  • loose herbs
  • make it yourself
  • mangos
  • marmalade
  • missionaries
  • missionary life
  • MIY
  • movie
  • mud house
  • muffins
  • my faith
  • my family
  • my story
  • Naomi
  • natural birth
  • natural deodorant
  • natural drinks
  • natural home alternatives
  • natural living
  • natural nipple cream
  • natural postpartum care
  • natural pregnancy
  • natural preventative care
  • natural remedies
  • natural sweeteners
  • naturally sweetened sweets
  • Nourished Kitchen e-course
  • Nourished Living Network eBook Bundle
  • nourishing ingredients
  • nourishing ways
  • nursing
  • nursing tea
  • nut & seed
  • nut-free
  • oatmeal
  • oatmeal bake
  • odd bits
  • orange powder
  • orange season
  • oranges
  • Organics in Costa Rica
  • organize
  • Other Things
  • paleo/primal eBooks
  • palm shortening
  • pancakes
  • pecans
  • Pennywise Platter Thursday
  • peppermint
  • perserving naturally
  • photography
  • phytic acid
  • pie crusts
  • Poema
  • popsicles
  • porridge
  • postpartum books
  • potpourri
  • prayer needs
  • pregnancy
  • pregnancy books
  • pregnancy exercises
  • pregnancy health
  • Pregnancy Notes Series
  • pregnancy tea
  • preserving sourdough
  • preventing group b strep
  • probiotics
  • pumpkins
  • quiet time
  • raw apple cider vinegar
  • raw food
  • raw milk
  • Real Food
  • real food article
  • Real Food Face-Off
  • Real Food Media
  • Real Food Wednesday
  • real salt
  • recipe round-up
  • recipes
  • restaurant reviews
  • reviews
  • RO4Y
  • rolled oats
  • sea salt
  • simple life
  • Simple Lives Thursday
  • simple tips
  • slow cooker
  • smoothies
  • soaked nuts
  • soaking grains
  • soaking nuts
  • soups
  • sourdough
  • sourdough biscuits
  • sourdough cake
  • sourdough cinnamon rolls
  • sourdough cookies
  • sourdough cornbread
  • sourdough eCourse
  • sourdough english muffins
  • sourdough focaccia
  • sourdough journal
  • sourdough pizza
  • sourdough pot pie
  • sourdough starter
  • special guests
  • spirulina
  • stevia
  • sugar-free
  • superfood for pregnancy
  • supplements
  • Sweet Wholesome Wednesday
  • Tabitha
  • tea
  • thankfulness
  • Tobias
  • top posts
  • tortilla pizza
  • traditional food
  • travel snacks
  • traveling
  • Tuesday Twister
  • tutorial
  • Tyndale book reviews
  • Ultimate Homemaking Bundle Sale
  • walnuts
  • WAPF
  • WAPF food
  • Weekend Herb Blogging
  • whole food supplements
  • whole grains
  • wholesome
  • wholesome cookies
  • wholesome eating
  • wholesome snacks
  • wholesome sweets/desserts
  • winners

Blog Archive

  • ▼  2014 (12)
    • ▼  mai (3)
      • Pregnancy Notes: Postpartum Herbal Sitz Bath {recipe}
      • Pregnancy Notes: DIY Natural Nipple Cream {recipe}
      • Making the Adobe Bricks
    • ►  avril (7)
    • ►  janvier (2)
  • ►  2013 (50)
    • ►  décembre (1)
    • ►  novembre (3)
    • ►  octobre (7)
    • ►  septembre (3)
    • ►  août (4)
    • ►  juillet (2)
    • ►  juin (3)
    • ►  mai (8)
    • ►  avril (5)
    • ►  mars (6)
    • ►  février (5)
    • ►  janvier (3)
  • ►  2012 (41)
    • ►  décembre (6)
    • ►  novembre (3)
    • ►  octobre (1)
    • ►  juillet (6)
    • ►  juin (6)
    • ►  mai (4)
    • ►  avril (1)
    • ►  mars (2)
    • ►  février (5)
    • ►  janvier (7)
  • ►  2011 (82)
    • ►  décembre (19)
    • ►  novembre (1)
    • ►  septembre (2)
    • ►  août (7)
    • ►  juillet (9)
    • ►  juin (9)
    • ►  mai (11)
    • ►  avril (13)
    • ►  mars (4)
    • ►  février (4)
    • ►  janvier (3)
  • ►  2010 (30)
    • ►  décembre (1)
    • ►  avril (5)
    • ►  mars (3)
    • ►  février (19)
    • ►  janvier (2)
  • ►  2009 (134)
    • ►  décembre (21)
    • ►  novembre (15)
    • ►  octobre (13)
    • ►  septembre (10)
    • ►  août (17)
    • ►  juillet (12)
    • ►  juin (19)
    • ►  mai (13)
    • ►  avril (9)
    • ►  mars (5)
Fourni par Blogger.

Qui êtes-vous ?

Unknown
Afficher mon profil complet